Monday, December 8, 2008

Soft and cozy and quiet...

The sound-proofing insulation is done! I used Roxul Safe 'n Sound. That stuff is really easy to work with. It's light and cuts easy with a utility knife. It comes in pieces 48x15.5x3 inches in size which fits standard 16 inch framing which is why it's important to stick to standard framing methods and not just slap the lumber up any old way.


I ordered the drywall today for delivery next Saturday. In the meantime, here's some pictures:


Wednesday, November 5, 2008

Wiring Done!

After 500 feet of 12-gauge speaker wire, 200 feet of CAT-5, 200 feet of microphone cable, 80 feet of HDMI, and over 500 feet of electrical cable, I can finally say I'm finished with the wiring. The speaker wire includes the wires up to the plant shelf near the ceiling in the kitchen and rough-ins for speakers in the backyard. Of course, with that much wire, now I've got an antenna capable of picking up signals from the Andromeda galaxy.

Next step is to start installing soundproofing insulation in the wall and ceiling spaces around the home theatre. This will reduce any reverberation from the audio system and reduce noise from the drain pipes from upstairs.

Sunday, October 19, 2008

More wiring...

Another weekend spent installing wires. This time, while waiting for delivery of another 250 feet of speaker wire, I went ahead and started installing the rough-ins for the temperature and humidity sensors and microphones on the main level. I also drilled another hole through the outer wall of the house but this time in the rear wall. I attached a weather-proof enclosure to the hole on the outside in which I'll install terminals for outdoor speakers and temperature and humidity sensors. (I'll drill small holes to allow some air to pass through.)

A few pictures...


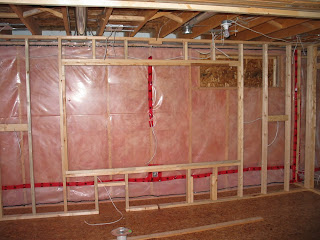
The projector screen wall with wires for left, centre, right speakers and subwoofer.


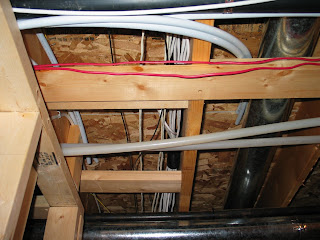
Bundle of wires running from the utility room. They include speaker wires, CAT-5 for the sensors, and microphone cables.


The rough-in for temperature and light sensor (on left) and the microphone installed in the kitchen. These microphones were designed originally to be used for conference rooms and are sensitive to human vocal frequencies which makes them ideal for voice recognition applications. For the temperature and ambient light sensor, I'll drill tiny holes in the plate and install the sensors in the wall behind it.

Monday, October 13, 2008

In a million years....

...mining prospectors will find a huge copper deposit where my house was. While I still have a few things left to do in the electrical portions I decided to begin working on the home theatre wiring. (I ran out of electrical cable staples and decided to switch gears rather than go out in the rain for a box of staples). The 40-foot HDMI cable for the projector was just the right length with enough slack on either end. I also ran the wiring for the surround sound speakers (front-left, front-right, centre, surround-left, surround-right and subwoofer) and the 2 speakers in the exercise room, all totalling 350 feet of 12 gauge speaker wire. The reason why so much wire was used is that the audio receiver/amplifier is not in the home theatre room itself, but in the utility room. I ordered more speaker wire so I can install speakers up on the plant shelf in the kitchen and rough-in for weather-proof speakers in the back yard for when I build the deck.

I also ordered another 40-foot HDMI cable for the LCD display in the exercise room so I can watch the news when I workout. And since the display will be wall mounted, I also ordered an HDMI wall plate so that the 40-foot cable can install to the plate inside the wall. The plate then provides a clean, professional looking interface point to plug in the display.

Sunday, October 5, 2008

Almost 225 metres...

I'm getting close to having all the electrical work done. I may hit 225 metres (738 feet) of electrical cable. And that's just 2-conductor cable. There's some 3-conductor cable in there too. All I have remaining to do, are the bar pendant light fixtures, the 3-way switch for the light over the stairs and terminating the lights that are currently tied off of circuits upstairs. The builders installed basic pull-cord lights in the basement that are powered by circuits from upstairs. I intend to remove the lights and terminate the lines at an outlet. This way, I won't have to terminate it in a junction box somewhere.

Sunday, September 21, 2008

The House Is Still Standing. Go Figure....

I decided to take advantage of the warm weather on Sunday to put a 4 inch hole through the side of the house for the basement washroom exhaust vent. I started drilling from inside to discover that the drill bit wouldn't go deep enough. Now, no guy wants to discover that their tool isn't long enough so, feeling rather deflated, I went to Home Depot to find a solution for my small problem. Twenty minutes later, I was back in business. Using both a wood bit and a masonry bit to get through the stucco, I was able to bore a hole big enough for the exhaust vent. I installed a vent hood and sealed it with caulking. After all that, the house didn't fall down. So, I guess I did it right.

Aside from that I managed to complete the wiring for four more circuits. Just one more to go and then I can install the circuit breakers.

Monday, September 15, 2008

Construction resumes!

Well, I finally broke down and bought a new drill. I found a 2 tool combo kit that included a drill and an impact driver for about the cost of one tool alone. I stood there at Home Depot staring at this package wondering why it was priced like that. It seemed kind of too good to be true and usually when something is too good to be true, it is. I got it anyway. Maybe one of them will blow up later...

I finished wiring a circuit -- the outlets in the home theatre room. Most of the outlets are in the exterior wall which was already insulated and sealed with vapour barrier. So, it was a bit of pain in the ass cutting back the plastic and pushing the fibreglass out the way so I could drill holes through the studs. Not to mention the fibreglass fibres kicked up with the drilling. I wore a mask but it doesn't catch everything. But now, the plastic's all Tuck-taped sealed up again.

Five more circuits to go. Then I can move on to the home theatre speaker wiring, projector cables, control cables for the basement heating duct servo motors, data cables for the 5 temperature sensors and 2 humidity sensors scattered throughout the house (and a set outside in the backyard), microphone cables for the voice recognition, and a sensor cable for the kitchen cooking probe.

Monday, August 18, 2008

Receiver doesn't know what hit him..

So the software development continues. I finished writing the service that let's any other software module in the system to command the Pioneer VSX9120 receiver. This model includes a serial interface and the Pioneer engineers were nice enough to document the command protocol and place it on their website. The module that I wrote will allow the control of volume, listening mode settings and radio tuner. The receiver provides audio output to the home theatre set up but also the whole house audio installation for listening to music, radio or for the central computer system to notify me of anything, like incoming phone calls, emails, or whatever.... When listening to music or radio, I can control the volume from any touchscreen in the house. The automation system can have control of the receiver as well. I can have the communication module lower the volume of music playback so I can answer a phone call, for example.

Sunday, August 17, 2008

Voice recognition update

I haven't posted in awhile. With the drill battery charger still on backorder, I've been busy working on the software side of this project.

I found a bunch of wall-mountable microphones which are specifically designed to be sensitive to vocal frequencies. Their primary application is for conference rooms but are ideal for voice recognition applications. I was also able to find a microphone mixer that automatically switches on the microphone receiving a vocal input. Today, I ran some tests to see how well the setup would work for voice recognition with a PC. I was able to get about 70% accuracy which is not the greatest but I spent only a little time training. These results are still not entirely conclusive to know if this will work fully installed in the house but I figure I'll give it a try. I wanted to see if at least some recognition would work so I'll go ahead and run the microphone wires throughout the house. The microphones themselves install in single-gang electric device boxes and look just like light switches. Worse case, if voice recognition doesn't work, I can pull the microphones out and patch the holes. Drywall is easy to fix.

So, if the voice recognition does work, it will provide another level of input alongside the various touchscreens to be installed throughout the house. The goal here isn't to replace everything with a voice command and tie myself to that. Everything can still be manually controlled so I wouldn't have to change the way I live my life. The voice command just fills in for those moments where it's more convenient to. After coming home after work and telling the system to playback any telephone messages is a simple example of an application for voice recognition.

Monday, July 14, 2008

If you want it done right...

I should have just ordered the charger for the drill myself. The guy I spoke to at the local Black and Decker supply store said they had chargers available but when I got there last Saturday, they didn't have any so they have it on order. So, hopefully, I'll have it for next weekend.

In the meantime, I've been moving the software development forward. I had previously developed the music playing system that allowed me to play any track out of my MP3 collection over my whole house audio. I have speakers in the living room, master bedroom and office. I'll be installing additional speakers in the kitchen, exercise room and eventually outdoor speakers for the deck when I build that. This week I'm upgrading the software to be able to support the new Pioneer receiver that I got for the home theatre. It will also support the house audio. Up till now, I've been using the PC's sound card as the amplifier. Now, I can use the receiver which will be much better. Plus, I'll have access to the radio. I don't really listen to the radio that much but since it's there, I might as well take advantage of it. I'll be writing a software module that will allow the music or home theatre software to control the receiver for volume control, audio characteric presets, and radio tuner.

Monday, July 7, 2008

The First Setback

I set out as usual to get some work done this weekend and discovered that the battery charger for my drill had died. So one battery was completely dead and I was able to get one use out the other battery. Fortunately, I was able to source a replacement charger but won't have time to pick it up until next weekend. In the meantime, I can switch gears and work on the other components.

I successfully got a TV tuner card to work in the HTPC. The only uncertainty there was that the HTPC is running XP Embedded and I wasn't sure if all the necessary software components were present to allow the card to work. Now with this working, I can watch TV on the big screen if I want. I may use this to send video to the living room TV and/or the exercise room TV. This will mean I would only have to get one HD terminal if I ever decide to upgrade my cable to HD.

Sunday, June 29, 2008

Electrical Thoughts

This weekend was a bit of a bust for getting work done because I got sidetracked with other chores and errands. I got through some of the electrical work last weekend but had to stop when I was getting tired and almost wired two switched light circuits in series. This would have resulted in a situation where if I want to turn on the centre bank of lights, I'd have to turn on the lights accenting the projector screen first! That would have been embarrasing to say the least.

I've planned to add 6 additional 15-Amp circuits to the breaker panel. Two of them are dedicated to the computer rack which will house 4 computers, the A/V receiver and any future growth. I've planned out the remaining circuits so that the overhead lights are not on the same circuits as the outlets. That way, if I plug something in that causes a circuit breaker to trip, I don't lose lights. Also, any high power devices won't cause lights to flicker or dim. I wish the electricians who wired my house during construction had thought of that. If I plug my iron in one of my bedroom outlets, the overhead light dims momentarily. Surprising, isn't it... I actually iron.

I contemplated also installing battery backed-up emergency lighting in key areas like the furnace room and the area underneath the stairs where the sump pump is. I found them to be a little expensive and a better alternative would be to have a AC charged flashlight that is always charged and ready to go in emergencies. It'll have the advantage of portability. I think I may consider a flood sensor in the sump pit however so if the pump ever fails and the pit starts to fill with water, I can be alerted to the fact if I'm home and even if I'm away from home by sending my cell phone a text message.

That's all for now...

Saturday, June 14, 2008

There's a buzz of electricity...

Well, there will be soon enough. I picked up a bunch of the electrical components from Home Depot today: electrical device boxes, outlets and four recessed lights to start. There was a new guy working in the electrical department so I had to explain to him how to install recessed lights. Nice guy, eager to learn. After the lesson, I sent him on his way to help some other customers.

Along with the electrical work, I also intend to run all the home theatre wiring. I ordered a 45 foot HDMI cable to connect the HTPC to the projector and 12 gauge speaker wire for the surround sound speakers. I got them from monoprice.com. They have really good prices and I got it delivered in about a week from the US. Both the HDMI and speaker wire are CL2 insulated which makes them ideal for in-wall installation because the insulation is slow to burn in case of fire.

I also want to install wiring for the internal sensor network that provides input to the home automation system. The sensors will measure temperature, humidity and light levels. The thermostat that controls the home HVAC (heating ventilation and air conditioning) system will also be computer controllable and I want to have the system use the temperature readings throughout the house to help regulate the operation of the furnace and air conditioning instead of just the thermostat in the hallway. In addition, wireless motion sensors will be installed and the intention is to have the system recognize which rooms are occupied and regulate the HVAC to optimize the temperature for those rooms. The heat vents in the basement will be contollable as well so when the basement is unoccupied, the system will close the vents, thus maximizing the heating or cooling air pressure to the upstairs. It's all theoretical and I won't really know if it'll work until I try it.

I need to run some tests on a set of wall mountable microphones and an automatic mixer to see if implementing voice recognition is feasible. If so, I'll go ahead and install those for future development. That system will consist of five wall mountable microphones that are specifically designed to be sensitive to human vocal frequencies thus reducing the pickup of ambient noise. The mixer automatically switches to the microphone that has the highest level input and feeds that source to the central PC for processing.

Wednesday, June 11, 2008

Waterworks....who wants to look at my pipes?

Plumbing in new houses is really easy. Water supply is run through plastic pipes called Pex. This flexible pipe allows you to run a line from the main water line, which is 3/4", to the fixture using a 1/2" line. The flexibility allows you to make one continuous run with no elbows as there would be with copper pipes. Elbows cause turbulence which then hampers the water flow. Here are a couple of photos showing the white Pex for the washroom and wet bar fixtures. I'll attach them to the water supply in the utility room after the fixtures are attached. This all took me 2 or 3 hours.


Sunday, June 1, 2008

Every Saturday morning, I've been getting wood...

...from The Home Depot. (Sorry, I had to use that at least once!) But now, those days are coming to an end. This weekend I completed the last of the rough framing. There may be the odd item here and there that I'll discover I need to do to for attaching drywall but as it stands now, I've got everything built that I intended.

Here's a photo of the false wall that will support the projection screen of the home theatre. That big rectangle is where the screen will attach and measures 92 inches wide by 51.75 inches tall. I've put the sub-woofer in its position to test the fit.


I've built a cover for the window that's up in the upper right. My original plan many months ago, had the screen built on a box over to the left but I finally decided to just build an entirely new wall so the screen could be centred horizontally. This definitely looks much better.


Next task: plumbing for the washroom and wet bar.


Monday, May 26, 2008

A Little More...

I'm getting close to finishing the rough framing. All I have left is a small column to cover the unused shower drain and the projector screen false wall. Here are a few more photos.


This is the cover for the main drain stack and a telepost. It was kind of annoying having those two pretty much in the middle of the home theatre room. I contemplated other options like complete walls but I didn't want to carve up the space like that. So I settled for a large column.


This is that same column attached to the framing that covers the main HVAC ducts. Those horizontal spars are about 4 feet long. Attaching them by myself was tricky. I made myself a little hook with some scrap lumber. I'd slip it around one of those "ladder" like structures and hang one end of the spar on it and screw in the other end. Then I'd move around to the other side, slide the hook out of the way and screw in that end.


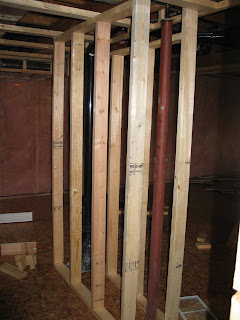
I had to frame a new ceiling for the washroom because of that black pipe that sits below the upstairs floor joists. I amazed myself by constructing a perfectly level ceiling!


That'll pretty much be it for the rough framing photos. Pictures don't quite capture how much work has been done but I'll have one more photo of the false wall that I'll be building to support the projector screen. After that, I'll be getting into the plumbing and electrical.


Tuesday, May 20, 2008

Home Theatre Equipment

For the past few months while doing the construction, I've been researching and purchasing the various components for the home theatre system. I've been lucky enough to get some deals too.

The heart of the system is the home theatre personal computer (HTPC). This system is a basic PC with a high-definition (HD) video card, good quality on-board audio and 2000GB (2TB) of storage capacity. With hard disks currently available, I can upgrade it to 8TB. All of the movies that will be viewed with this home theatre will be stored on the HTPC. I'll also be installing a TV tuner card so I can watch TV on the big screen if I want to. If needed I'll upgrade the card to be able to pull in the video output from a Shaw HD terminal whenever I get around to subscribing to HD service. I'm in no rush for that right now. Eventually, when the price drops enough, I'll install a Blu-ray reader in the HTPC.

When a movie plays, the audio data will be transmitted to a Pioneer VSX-9120TXH receiver where the data is processed and output to the surround sound speaker set. The speakers consist of 4 Polk Audio RM101 surround speakers, a RM202 center channel and a PSW10 subwoofer. I'm sticking with a 5.1 system for now because there really isn't a huge benefit to going to 6.1 or 7.1 when most movies are 5.1. A handful of movies are 6.1 and the receiver can create a virtual back channel if needed. If I ever want to upgrade to a full 7.1 system, I can do that later. One of the reasons why I got this receiver is that it has an interface port that would allow me to command the receiver directly from the HTPC.

The video output from the HTPC is connected directly to a Sanyo PLV-2000 HD projector with resolution of 1920x1080. All of my movies are standard definition right now but the video card in the HTPC will upconvert to 1080. The projector also has an interface port that will allow command and control from the HTPC. The projector will be ceiling mounted and will project the image on to a 92" x 51.75" (106" diagonal) acoustically transparent screen. This will allow me to put the center channel speaker behind the screen so dialogue will appear to come right from the screen. This projector/screen setup is 1.78:1 aspect ratio (or 16:9), which means that the width is 1.78 times longer than the height. This is standard HDTV aspect ratio so all the new plasma and LCD TVs out there are 1.78:1. Most movies are recorded in 2.35:1 aspect ratio so I'll still get horizontal black bars above and below the image when watching those movies. I looked into what I'd need to do to modify the system to do 2.35:1, thus eliminating the black bars, and discovered it would be a little bit over my budget -- we're talking thousands!

The HTPC and receiver will be installed in the utility room. The projector and speakers will be installed in the home theatre room with long cables bringing the signals over. This eliminates any kind of noise from the HTPC interfering with the movie watching enjoyment. By the way, one of the reasons why I chose that particular projector is that it has an exceptionally quiet cooling fan.

Movies will be played using custom software that I will be writing. This will let me have a single piece of software that will play the movie, control the receiver and control the projector. For a user interface, I'll be writing a controller program that will reside on a PDA which will communicate with the HTPC over WiFi or Bluetooth. I could also write an interface that displays on the big screen but I want to be able to select a movie without turning on the projector to save lamp life. The software will take care of turning on the projector after I've selected the movie I want to watch. And since the HTPC is on the same network as the home automation system, the sky's the limit on how the theatre is controlled: schedule, motion controlled, voice command, whatever... I can have the software designed so that if someone gets up during the movie, the lights will be brought up a little so no one stubs their toes or walks into a wall on their way to the washroom. Or, the system can automatically pause the movie if the phone rings.

So there's the guts of the home theatre. I'm still in the middle of designing and writing all the software. It's lots to do but it'll be worth it when it's done!

Monday, May 19, 2008

Construction...


The washroom with Dricore on the floor. The drain stubs for the toilet, shower and sink were put in by the builders. I won't be putting in a shower (on the left) so I'll be covering that up.


This is a view from the bar looking towards the stairs. The washroom is on the right that's at the end of a short hallway. You can also see the door way to the home theatre where I'll put in a set of double-doors.

Neighbour's cat watching me work.
To date, I've completed the primary walls and am in the process of building soffits and chases around pipes, poles and ductwork. I'll post pictures of those soon.


Wednesday, May 14, 2008

Building Codes

Since I've never done this kind of construction before, I needed to figure out exactly how to get started. I could have just started nailing boards and running wires but I wanted to make sure I did it right. The City of Winnipeg provides easy to understand brochures that describe framing, electrical and plumbing. For example, because of the potential for basement floors to shift, it's required to leave at least a 19mm gap above or below partition walls. It's easier to leave the gap on top because otherwise, I'd have to hang the partition walls from the joists. There are requirements for doors, the number of outlets and light fixtures on an electrical circuit and it's necessary to install an exhaust fan in the washroom because the only thing separating you from various noxious sewer gases is a little puddle of water in the bottom of the toilet bowl!

Armed with this information, I was able to set out with a real plan of building my basement. Coming up next .... pictures of some of the framing including the finished Dricore installation.

Monday, May 12, 2008

A Word About Dricore

When I started planning my basement, I was concerned with having the flooring sitting right on top of cold concrete. Even with an underpad, you'd still feel the rock-like hardness underneath your feet. I decided then that I would build a subfloor. The standard way of building a subfloor involves laying pressure treated 2x4's on the concrete and screwing floorboards on top. Flooring material like carpet can then be installed on top. However, this means that I'd lose over 2 inches of vertical height.

I then started looking into alternative solutions. You can get a dimpled plastic material that's rolled out on to the concrete and then cover with 5/8" plywood floor boards. I was considering using that when I discovered Dricore. Dricore is a 24"x24" tile that's 7/8" high. On the bottom is a plastic layer with a waffle-like pattern that allows air to circulate and on top is random wafer board. The tiles are simply floated on top of the concrete floor and attach to each other in tongue-and-groove fashion. I was able to install the entire basement in two weekends.

Sunday, May 11, 2008

"Before" Pictures


The first photo is the back corner where the bar will be. You can see stacks of Dricore which will be used to build the subfloor. The second photo is where the home theatre will be. And the third photo is of where the exercise room will be. The house is a bi-level so it allows it to have a big front window.


Saturday, May 10, 2008

The Floor Plan


Here's the basic plan for the basement. The home theatre has the projection screen on one end and a wet bar on the other. (Click to enlarge.)

Friday, May 9, 2008

What Am I Doing?

Ok, so what am I doing? I bought the house in 1999 and I knew that I wanted a home theatre and to design a home automation system. The home automation system is a way of centralizing control of lights, heating and cooling, door locks, audio and video and whatever else I can think of. I became aware of the idea of computerized control probably around 15 years ago and at the time, the technology wasn't readily available and what was available, wasn't very mature. Now, there's a growing industry in home automation. Professional installers are charging big bucks (we're talking tens of thousands) to install customized systems but I know I can do it myself for a lot less and produce a solution that fits my needs.

Why am I doing this? For the most part, it's just for the plain fun of designing something like that. Yes, I find stuff like that fun. I'm a nerd, big deal! But how cool would it be? Sure, I could get timers to turn on the porch light before I get home from work in the winter or turn down the heat when I leave for work in the morning, but the timers won't know that it's a holiday or that I just decided to take a day off and stay home. My system will know.

So what does all that have to do with the basement? Well, I'm building the basement so I can have the home theatre to watch movies. The thing is, is that I don't want to have a bunch of stand-alone components just for that. I want it integrated into the home automation system. So that would give me the ability, for example, to pick a movie I want to watch, maybe while making dinner in the kitchen, and then after dinner simply going downstairs and tapping a single keypad. This will trigger the lights to dim, projector to power up and the movie to start playing. No futzing about turning this on and that on, digging through shelves of DVDs, etc... Or maybe someday just using a voice command.

So over the course of this year, I plan to have the basement finished with the home theatre installed, plus have much of the core home automation system designed and installed. I've been doing all of the construction myself but will get the carpet and bar installed professionally. For a lot of it, I'm learning as I go. I've made a few mistakes here and there but I can live with them. All of the home theatre and home automation software, I'm writing myself.

Wednesday, May 7, 2008

Introduction

I've decided to start a blog to document the process I've been going through in renovating my basement. I've had a lot of people asking about it so I thought a blog would be a good way to answer some questions.

I plan to post floor plans and photos of the construction process and I'll also describe all the 'stuff" that's going into my basement and the rest of the house, in particular, the home automation system and the home theatre system.